How To: OAuth2 Authentication With OAuth2-Proxy, NginxProxyManager, and Keycloak

The Setup
Today we are going to set up Keycloak with oauth2-proxy and Nginx so that all of our services are protected by a FIDO security key, except for those that we choose to leave public. We are going to be using Docker containers and creating a new virtual machine called hs-auth-01 to run Keycloak and auth2-proxy. Nginx actually runs on a separate virtual machine that is called hs-edge-01, which is the gateway into the entire network. Ports 80 and 443 are exposed to hs-edge-01, which we will set up to proxy to oauth2-proxy and keycloak. Let’s get started.
Creating Our Virtual Machine
The first step is to create our virtual machine. We don’t want to consume a lot of resources, but it needs to be able to run Ubuntu Server.
We chose to give it the following specs:
RAM: 2GB
CPU: 1x 2.2Ghz core
HDD: 24gb
OS: Ubuntu 22.04 Server (Minimized)
IP: 192.168.5.21
Of course the edge virtual machine is running on the same server which is currently using VMWare, but will be blown out and rebuilt with ProxMox in the future. So go ahead and install Linux and give it an IP address. The IP Address we will be using is 192.168.5.21, and again the host name will be hs-auth-01. Make sure to select Ubuntu Server (minimized) when doing the setup so as to reduce the bloat of the operating system and save storage space.
While for nearly all of my VMs I enable LUKS on the boot drive, hs-edge-01 and hs-auth-01 will not have password based disk encryption so that in the event of a power failure we can still get back into the server from anywhere and log into the other VMs. So far this happens very rarely, but it does happen.
Go ahead and install docker and docker-compose as well, and openssh if you forgot to earlier. I had to also install nano and htop, which is my favorite editor and a process manager to view memory/cpu consumption.
Setting up Keycloak
Next, we set up Keycloak. Either in your virtualization software (I use Proxmox) or by SSH, open up a shell to hs-auth-01. I put everything for Keycloak under /srv/keycloak/ on hs-auth-01 because /srv/ is where I keep all of my docker-compose.yml files.
Go ahead and create the directory. We’ll also use nano to create the docker-compose.yml file.
Here is a one-liner for quick setup:
sudo mkdir /srv/keycloak/ && cd /srv/keycloak/ && sudo nano docker-compose.ymlHere is the complete docker-compose.yml file for Keycloak:
version: '3.9'
services:
  postgres:
    image: postgres:13.2
    restart: unless-stopped
    environment:
      POSTGRES_DB: ${POSTGRESQL_DB}
      POSTGRES_USER: ${POSTGRESQL_USER}
      POSTGRES_PASSWORD: ${POSTGRESQL_PASS}
    volumes:
      - ./database:/var/lib/postgresql/data
    networks:
      - keycloak
  keycloak:
    depends_on:
      - postgres
    container_name: keycloak
    environment:
      PROXY_ADDRESS_FORWARDING: 'true'
      REDIRECT_SOCKET: 'proxy-https'
      KEYCLOAK_FRONTEND_URL: 'https://oauth.mydomain.com/auth'
      DB_VENDOR: postgres
      DB_ADDR: postgres
      DB_DATABASE: ${POSTGRESQL_DB}
      DB_USER: ${POSTGRESQL_USER}
      DB_PASSWORD: ${POSTGRESQL_PASS}
    image: jboss/keycloak:${KEYCLOAK_VERSION}
    ports:
      - "28080:8080"
    restart: unless-stopped
    networks:
      - keycloak
networks:
  keycloak:
Now past the contents above into your docker-compose.yml file and CTRL+X to save and exit, then open the .env file with nano as well. If you want the database stored somewhere else you will need to change it’s volume path from ./database to where ever you want it to be stored. I use the current directory as it’s an SSD on my hardware.
Here is a one-liner to open the .env file for quick-setup:
cd /srv/keycloak/ && sudo nano .envAnd here is the contents of the .env file:
KEYCLOAK_VERSION=13.0.0
PORT_KEYCLOAK=8080
POSTGRESQL_USER=keycloak
POSTGRESQL_PASS=PASSWORD_HERE
POSTGRESQL_DB=keycloak
You can modify the version, port, user, and DB if you would like, but you have to modify the password. I would give it something 12-16 characters with symbols, numbers, and uppercase and lowercase letters. Save this file with CTRL+X also.
Now it’s time to start Keycloak. Run the following:
cd /srv/keycloak/ && sudo docker-compose up -dNow that our container is online, try to access it by visiting http://192.168.5.21:28080
If Keycloak came up, perfect. Now you can proceed to setting it up in NginxProxyManager so that
Squirrel: Resetting Admin Password
If you forgot your admin password, run the following command to enter the docker container:
sudo docker exec -it keycloak /bin/bashOnce you are in the docker container, run this command:
cd /opt/jboss/keycloak/bin/ && ./add-user-keycloak.sh --user YourUser --password YourNewPass --realm master && exitReplace YourUser and YourNewPass with the username and password of the account you want to create. Note: Keycloak may be at /opt/keycloak instead, but this is where it was for me. Next we need to restart the container to apply the user.
cd /srv/keycloak/ && sudo docker-compose restartNext, log into Keycloak at http://192.168.5.21:28080/auth/admin/ with the username and password you set above. If you didn’t change the values, it will be what’s in the script you ran. Don’t worry it’s only temporary. Make sure you are on the master realm in the very top left corner, then proceed to Users -> View All Users. You should see your new user listed and the old user as well. Click the edit button next to the old user and navigate to the credentials tab. Type in a new password and confirm, uncheck temporary, and hit reset password.

Now log out in the top right and log back in with the password you just set. Navigate back to users (make sure you are on the master realm) and delete the temporary user we created. That wasn’t too bad. Now proceed with where you left off.
Alright, so first we need to set up a realm, then we need to create the client, role, and user. You can name the realm whatever you want. I used Eanix.
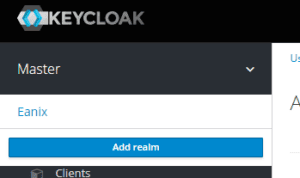
Now that you have created your realm, go back to the menu in the top left and select it. Next we need to create the client. Select Clients on the left and then Create on the far right.

You will be taken to the screen above. Create a Client ID using only lowercase letters and hyphens. In my example I used “oauth2-proxy” but it doesn’t really matter as long as you follow the naming scheme. Leave the protocol the same, which is openid-connect. You can leave the Root URL blank.
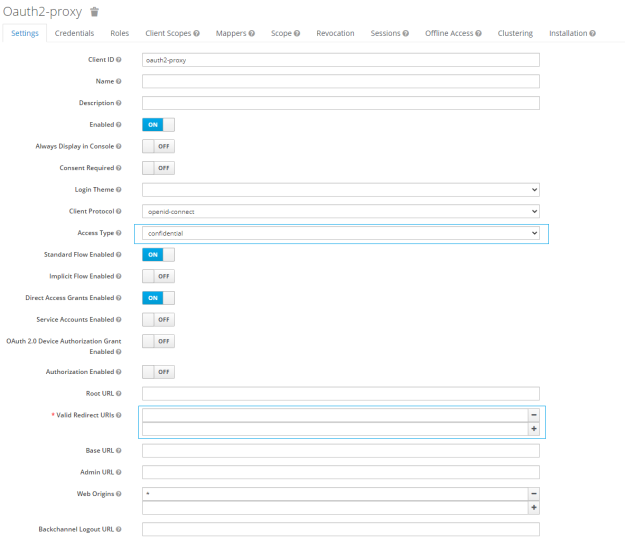
Instead of using a public client access type, we are going to use a confidential one. The callback URL is the domain that OAuth2-Proxy is proxied on, but we will set that up in a bit. If you know the domain, you can go ahead and set the Valid Redirect URL to https://oauth.mydomain.com/oauth2/callback
You can leave Keycloak Admin open as a tab for now, we will need to come back to it here in a minute. Now we will be installing oauth2-proxy.
OAuth2-Proxy
Now we need to install oauth2-proxy. I put the docker-compose.yml file into /srv/oauth2-proxy/ next to keycloak. Let’s create the directory, change to it, and open our text editor for docker-compose.yml
sudo mkdir /srv/oauth2-proxy/ && cd /srv/oauth2-proxy/ && sudo nano docker-compose.ymlHere is the full docker-compose.yml file for oauth2-proxy:
version: "3.7"
services:
  oauth2-proxy:
    image: bitnami/oauth2-proxy:7.4.0
    depends_on:
      - redis
    command:
      - --http-address
      - 0.0.0.0:4180
    network_mode: host
    environment:
      OAUTH2_PROXY_REVERSE_PROXY: 'true'
      OAUTH2_PROXY_HTTP_ADDRESS: '0.0.0.0:4180'
      OAUTH2_PROXY_EMAIL_DOMAINS: '*'
      OAUTH2_PROXY_PROVIDER: oidc
      OAUTH2_PROXY_PROVIDER_DISPLAY_NAME: Eanix
      OAUTH2_PROXY_SKIP_PROVIDER_BUTTON: 'true'
      OAUTH2_PROXY_REDIRECT_URL: https://oauth.mydomain.com/oauth2/callback
      OAUTH2_PROXY_CODE_CHALLENGE_METHOD: 'S256'
      OAUTH2_PROXY_OIDC_ISSUER_URL: ${ISSUER}
      OAUTH2_PROXY_CLIENT_ID: ${CLIENT_ID}
      OAUTH2_PROXY_CLIENT_SECRET: ${CLIENT_SECRET}
      OAUTH2_PROXY_SKIP_JWT_BEARER_TOKENS: 'true'
      OAUTH2_PROXY_OIDC_EXTRA_AUDIENCES: api://default
      OAUTH2_PROXY_OIDC_EMAIL_CLAIM: sub
      OAUTH2_PROXY_COOKIE_SAMESITE: 'lax'
      OAUTH2_PROXY_COOKIE_DOMAINS: '.mydomain.com'
      OAUTH2_PROXY_WHITELIST_DOMAINS: '.mydomain.com'
      OAUTH2_PROXY_SET_AUTHORIZATION_HEADER: 'true'
      OAUTH2_PROXY_SET_XAUTHREQUEST: 'true'
      OAUTH2_PROXY_PASS_AUTHORIZATION_HEADER: 'true'
      OAUTH2_PROXY_PASS_ACCESS_TOKEN: 'true'
      OAUTH2_PROXY_SESSION_STORE_TYPE: 'redis'
      OAUTH2_PROXY_REDIS_CONNECTION_URL: 'redis://127.0.0.1:6379'
      OAUTH2_PROXY_COOKIE_REFRESH: 30m
      OAUTH2_PROXY_COOKIE_NAME: '__SESSION'
      OAUTH2_PROXY_COOKIE_SECRET: ${OAUTH2_PROXY_COOKIE_SECRET}
      OAUTH2_PROXY_COOKIE_CSRF_PER_REQUEST: 'true'
      OAUTH2_PROXY_COOKIE_CSRF_EXPIRE: '5m'
  redis:
    image: redis:7.0.2-alpine3.16
    volumes:
      - ./redis:/data
    network_mode: host
There is a lot to this file, so let me break some of it down for you real quick. Here are the key environment variables that need to be set, and here is the corresponding documentation on what each one are. They look a little different, but it’s basically replace hyphen with underscore, make it all caps, and add OAUTH2_PROXY_ in front of it. Here is the documentation.
OAUTH2_PROXY_WHITELIST_DOMAINS – This is the domain that is allowed to access OAuth2-Proxy, it includes sub domains with the decimal in the front. Since we are only hosting our subdomains behind single sign on there is only one option for this.
OAUTH2_PROXY_COOKIE_DOMAINS – This is the domain that the cookie will use. Again we use the primary domain and with a dot in front of it to indicate that subdomains are allowed. If this is incorrect you may get redirect loops during the OAuth2 handshake.
OAUTH2_PROXY_REDIRECT_URL – This is the URL of the callback or valid redirect URL from editing our client in Keycloak.
OAUTH2_PROXY_PROVIDER_DISPLAY_NAME – This is the title shown on the login page, you might want to change it to something that suits you.
Everything else needs to stay as it is. If you want to change the port be sure to change it in both the environment variable and the commands.
Now we need to set the rest of our environment variables in our .env file. Here is a one-liner to create the .env file:
cd /srv/oauth2-proxy/ && sudo nano .envAnd here is the contents of that .env file:
ISSUER=https://oauth.mydomain.com/auth/realms/Eanix
CLIENT_ID=oauth2-proxy
CLIENT_SECRET=SECRET_GOES_HERE
OAUTH2_PROXY_COOKIE_SECRET=NOT_USED_BUT_REQUIRED1234F_VALUE
Let’s break down what this is real quick.
ISSUER – The issuer is the location of your Keycloak realm, as defined under base URL in Keycloak under Clients. Just remove the /account/. Remember our realm was called Eanix, so that’s why you are seeing it above.
OAUTH2_PROXY_COOKIE_SECRET – Supposedly this isn’t used, but it’s required to be 32 characters long.
CLIENT_ID – This will only need to be changed if you set your own client ID instead of using what I used. Navigate to Clients -> Your Client -> Settings (Tab) to see the client ID.
CLIENT_SECRET – The client secret is obtained from Keycloak. Navigate to Clients -> Your Client -> Credentials (Tab). You can click Regenerate Secret to create a new one. I’m unsure how the first one is generated, so I would go ahead and click it a few times. Do not do it after this step unless you are compromised, though.
Now that you have filled in your environment variables for the docker-compose.yml script, it’s time to start the container. Here is a one liner to launch the container:
cd /srv/oauth2-proxy/ && sudo docker-compose up -dNow that our containers are up, it’s time to set up NginxProxyManager and configure the proxy hosts to use authentication.
Nginx Proxy Manager
Nginx Proxy Manager, or NPM, has worked well for me over traefik. It’s a personal preference and I much prefer the web interface, plus the fact that it has built in, albeit basic, security. Nginx Proxy Manager also supports Let’s Encrypt and a variety of APIs to do DNS authentication for your domain. I personally do not have problems with the HTTP authentication as I foward both port 80 and 443. Some ISPs will block port 80 on consumer accounts, so if they do you might have to use DNS based authentication for Let’s Encrypt. I use Cloudflare for my domains’ DNS, and used Digital Ocean previously. Both are supported and work with little effort.
Let’s get started. Navigate back over to the edge server that we created a long time ago via SSH or remote access. For me this would be 192.168.5.20. The VM’s entire purpose is a few docker containers, but it serves as a shield (and a choke point in a DDOS) for any break out of container / nginx exploit combos.
Let’s start with the docker-compose.yml file. Here is a one liner to create it:
sudo mkdir /srv/nginxproxymanager/ && cd /srv/nginxproxymanager/ && sudo nano docker-compose.ymlNow copy and paste the following docker-compose.yml file into the terminal:
version: '3'
services:
  app:
    image: 'jc21/nginx-proxy-manager:latest'
    restart: unless-stopped
    ports:
      - '80:80'
      - '81:81'
      - '443:443'
    environment:
      DB_MYSQL_HOST: "db"
      DB_MYSQL_PORT: 3306
      DB_MYSQL_USER: "npm"
      DB_MYSQL_PASSWORD: "npm"
      DB_MYSQL_NAME: "npm"
    volumes:
      - ./data:/data
      - ./letsencrypt:/etc/letsencrypt
  goaccess:
    image: gregyankovoy/goaccess
    container_name: goaccess
    restart: always
    ports:
      - '7889:7889'
    volumes:
      - ./data/logs:/opt/log
      - ./goaccess/storage:/config
  db:
    image: 'jc21/mariadb-aria:latest'
    restart: unless-stopped
    environment:
      MYSQL_ROOT_PASSWORD: 'npm'
      MYSQL_DATABASE: 'npm'
      MYSQL_USER: 'npm'
      MYSQL_PASSWORD: 'npm'
    volumes:
      - ./database:/var/lib/mysql
There is no need to make any changes to this one. You can optionally change the database passwords if you want to. It’s not publicly exposed though so it is unlikely it will have any login attempts at all.
Let’s go ahead run our one-liner to start the containers:
cd /srv/nginxproxymanager/ && sudo docker-compose up -dYou can now access Nginx Proxy Manager on port 81 with the IP address of your edge VM. Be sure that your firewall blocks all ports but port 80 and 443 so that no one can access port 81 from the outside. If you want you can set up a reverse proxy for your site to point to NPM’s port 81 and access it over HTTPS. I very much prefer not having any unencrypted traffic on my network at all, especially with sensitive passwords.
At this point you will need to configure your router/firewall to port forward 80 and 443 to the Edge VM at 192.168.5.20 (in our case). Personally I have a VM with Arista firewall sitting between my home router and edge VM blocking all ports except port 80 and 443. The home router has my second router in a DMZ public facing. If you do not have the ability to use port 80 (for example, 443 works but not 80, even though they are both forwarded) then you will have to use DNS in later steps to authenticate Let’s Encrypt.
The default login for Nginx Proxy Manager is as follows:
Username: [email protected]
Password: changeme
You can change both of these once you log in. Keep in mind that the email you set will be used for your Let’s Encrypt certificates. This can be changed individually.
Now let’s create our hosts. I am using oauth.mydomain.com as my OAuth2 domain.
The screenshot below uses “Request a new SSL Certificate.” It is recommended to use the SSL Certificates tab in the admin console to create wildcard certificates for your domain using DNS challenges. The reason for this is because your domain will show up on a website if you don’t. At least with wildcards the subdomain would have to be guessed. If you do this, you would select the certificate here instead of using the option to request a new one.
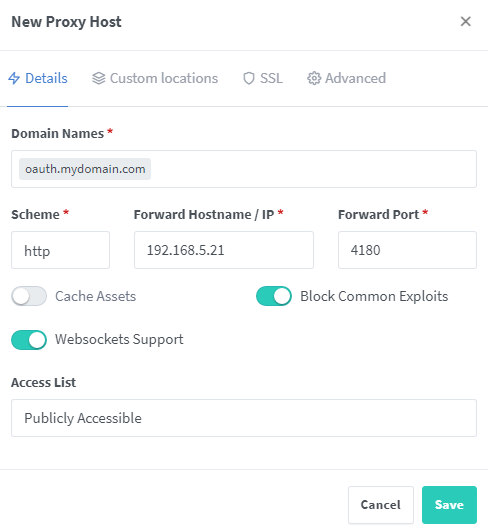
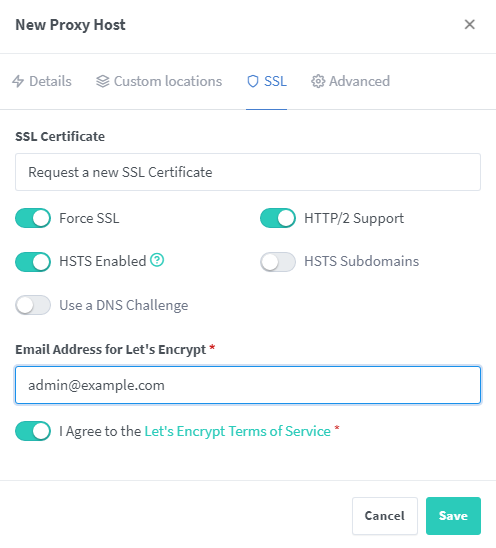
I go ahead and check Block Common Exploits and Websockets Support as well for all of my proxied hosts, just in case. In the second tab, under SSL, we set it to Request a new SSL Certificate, which uses Let’s Encrypt, and check Force SSL, HTTP/2 Support, HSTS Enabled, and deal with the terms of service. If you can not receive traffic on port 80 you will need to use the DNS challenge instead, which utilizes an API key for your DNS provider.
If your DNS provider isn’t listed, my favorites are Cloudflare, Digital Ocean, and Namecheap, but I am not aware of many of the others either.
Once your ready to go, click Save. It will take a little bit to load, but if port 80 is unblocked it should go straight through. If port 80 IS blocked, it will error out with a vague error message. If you can’t get Let’s Encrypt to work, you can add purchased SSL certs within NPM as well.
Do this again for any applications you want to be able to access from the internet, repeating the steps above.
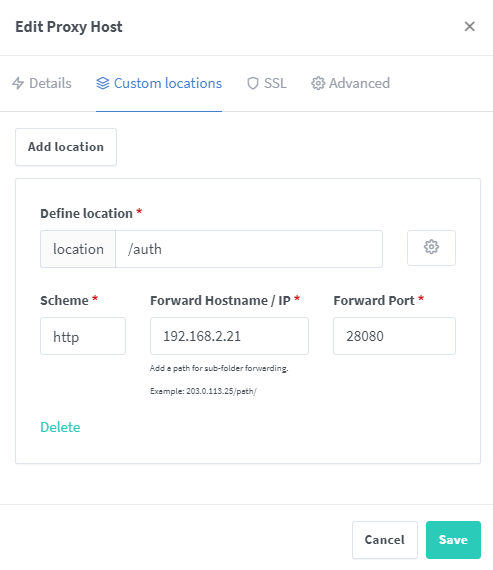
Lastly, you need to set up the custom location to be able to access Keycloak from oauth.mydomain.com/auth, doing it this way makes it appear as if it’s the same server running both. This is how you will terminate Keycloak with https for access from the outside world. The Cookie is a “SECURE” cookie as well, so it will not let you sign in until Keycloak is behind https. This can be changed, but that is outside the scope of this guide.
I have two files for you that you will need to copy into the data directory for NPM. Here are those two files:
First we have require_auth.conf, here is a one-liner to create it:
cd /srv/nginxproxymanager/data/nginx/custom/ && sudo nano require_auth.confAnd here is the content of require_auth.conf:
auth_request /oauth2/auth;
# if the authorization header was set (i.e. `Authorization: Bearer {token}`)
# assume API client and do NOT redirect to login page
if ($http_authorization = "") {
        error_page 401 = https://oauth.mydomain.com/oauth2/sign_in?rd=$scheme://$host$request_uri;
}
auth_request_set $email  $upstream_http_x_auth_request_email;
proxy_set_header X-Email $email;
auth_request_set $user  $upstream_http_x_auth_request_user;
proxy_set_header X-User  $user;
auth_request_set $token  $upstream_http_x_auth_request_access_token;
proxy_set_header X-Access-Token $token;
auth_request_set $auth_cookie $upstream_http_set_cookie;
add_header Set-Cookie $auth_cookie;
You will need to change the 401 error page URL, which is a redirect upon authorization failure to the sign-in page. /oauth2/ is a location and works on any of the subdomains within Nginx. Let’s go ahead and create our locations.
Here is a one-liner to create server_proxy.conf and open nano:
cd /srv/nginxproxymanager/data/nginx/custom/ && sudo nano server_proxy.confHere is the file server_proxy.conf:
proxy_headers_hash_max_size 512;
proxy_headers_hash_bucket_size 128;
location = /oauth2/auth {
    internal;
    proxy_pass       http://192.168.5.21:4180;
    proxy_set_header Host             $host;
    proxy_set_header X-Real-IP        $remote_addr;
    proxy_set_header X-Scheme         $scheme;
    # nginx auth_request includes headers but not body
    proxy_set_header Content-Length   "";
    proxy_pass_request_body           off;
}
location /oauth2/ {
    proxy_pass       http://192.168.5.21:4180;
    proxy_set_header Host                    $host;
    proxy_set_header X-Real-IP               $remote_addr;
    proxy_set_header X-Scheme                $scheme;
}
location = /oauth2/sign_out {
    # Sign-out mutates the session, only allow POST requests
    if ($request_method != POST) {
        return 405;
    }
    proxy_pass       http://192.168.5.21:4180;
    proxy_set_header Host                    $host;
    proxy_set_header X-Real-IP               $remote_addr;
    proxy_set_header X-Scheme                $scheme;
}
You may need to change the IP:Port in the proxy_pass directive, but everything else should be fine as is.
Now that these two files are created we need to include them into the proxy host configuration.
To do that, we use a trick within NginxProxyManager that utilizes custom locations.
So open up the proxy host that you want to put behind your OAuth2 authentication. Make note of the IP address, protocol, and port. Then click the Custom Locations tab. Create by clicking add location and then entering / as the location, as pictured below.
Fill in your IP address, protocol, and port from the previous tab, and then click the gear for advanced settings.
Enter the following into the advanced settings:
  # Requre OAuth2 Authentication
  include /data/nginx/custom/require_auth.conf;
Your done. Now click save. If the Online changes to Offline, then you did something wrong and will need to try again. Typically this will be a syntax error or that require_auth.conf doesn’t exist. Here is a screenshot to show the final configuration for the custom location.
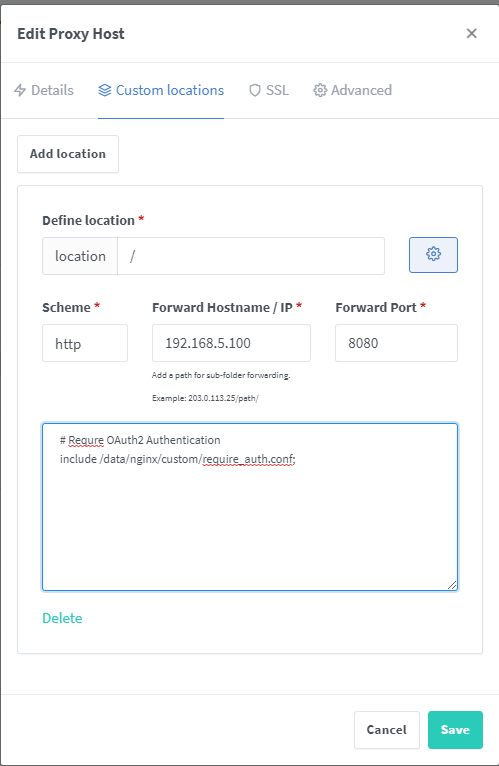
You should now be good to go. When you visit the domain for the proxy host that you protected you should be redirected to your oauth domain to sign in. Be sure to create a role and user in Keycloak’s Admin. It’s under Manage -> Users in the left navigation.
Please let me know in the comments or via email at [email protected] if you have any issues when setting up any of the services above.
Adding WebAuthn / FIDO2 Support
If you would like to use WebAuthn or FIDO2 with your oAuth set up, like I do, here is a guide on setting up WebAuthn on Keycloak:
WebAuthn for Keycloak Tutorial
Updates & Changes
3/16/2023: Modified require_auth.conf and removed some redundant headers that were causing a 400 bad request on some services. Added WebAuthn tutorial
4/3/2023: Updated the article to use the GUI method instead of editing configuration files for each proxy host. Removed expires setting from server_proxy.conf so that OAuth2 stays logged in for longer periods of time. Added notice about requesting a certificate with Let’s Encrypt.


